This is definitely going to be a more personal post, just an FYI.
Most days I absolutely LOVE owning my own business. But it definitely can have its drawbacks, some of which rared their ugly heads this week.
I'm not sure what kind of illness hit our family over the last week, but it's been vicious & drawn out. Everyone had completely different symptoms, and other than my oldest (knock on wood), everyone has fallen victim to it.
We've spent the week pretty much quarantined in the house, and now we are all going absolutely frickin stir crazy!
Our youngest should be heading back to school tomorrow. My middle one, I'm not sure yet, cuz he still has a really nasty cough. My oldest is homeschooled, and yeah, with this chaos, he's hardly gotten anything done this week.
And work. Wow. Yeah, I'm behind. Not on orders. But my normal to do list, ages behind. I was able to sneak down there for a little bit a couple days ago, and get the time sensitive orders out the door. I have a couple more that I'm hoping to finish up after the kids have gone to sleep for tonight, so they can ship tomorrow.
So I've been more than a little out of touch for the last week. I think I have gotten caught up on all our emails, convos, messages, etc. But if I've missed you, let me know. While I'm not sick any more, taking care of three other sick people has left me exhausted & scatterbrained. I suspect it will still be fairly chaotic for another few days, then craziness on Monday working to get orders caught up to ship out on time. So be patient with me!
Thanks! Love you guys!!!
Lindsay

Thursday, January 31, 2013
Friday, January 18, 2013
BIG International Shipping Changes
I admit it, we have all been spoiled by the fantastic rates that the USPS have been offering, especially for international shipping rates. It's amazing that for just a few dollars, we could send a package around the world.
Alas, it has caught up to them, and the costs are being passed on to all of us. On January 27, 2013, USPS is raising their shipping prices. Domestic (within the US), the rates aren't increasing too much, so we are keeping the Flat Rate Shipping Program active for the US. But the International Rates will be seeing some serious jumps.
Seeing as many of you shop with us on Etsy, we pulled this photo from one of their recent blog posts. It really demonstrates the drastic differences in some of the most commonly shipped international packages. (first column is 2012's prices, the second column is 2013's prices)

We are going to be starting out our smallest & lightest products out at $8.00 for shipping & handling (this includes the postage, shipping materials & insurance), and go up from there based on weights. We aren't too concerned about our website orders. The shopping cart is linked with USPS and uses their calculator to calculate the rates based on the information we plug in for the products. And we've found it to be insanely accurate.
Etsy is where we may have to play with the rates a little until we get them right. We have set our "ship with" rates as low as we think we can, and will adjust them if we find we are underestimating.
Our biggest regret with this latest change is that we unfortunately need to end the Canadian Flat Rate Shipping Program. Our shipping rates to Canada had always been so comparable to US rates. They are now right up there with the rest of the International Rates. So we will be discontinuing that program with this new change.
If you have any questions, please feel free to ask them. Thanks again!
Lindsay
Thursday, May 31, 2012
Master the Look Tutorial: Strawberry Lemonade (UPDATED)
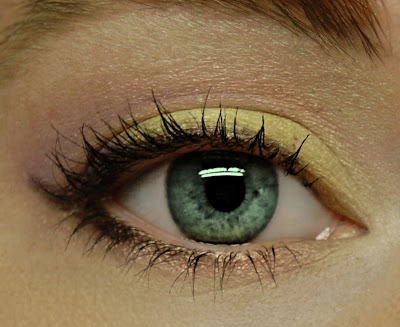
I wanted to play up our original version of our Strawberry Lemonade Eye Shadow Look. This is a fun playful eye shadow look that is perfect for summer! Vibrant yellows blend with pink and hint of purple.


Step by Step Photo Tutorial
First I started off with Persephone Eye Shadow. I dampened my eye liner brush a little, then wet the powder to make a paste. Then used that to wet line my eye liner.
Then I applied Daffodil Eye Shadow across the main lid.
Then I applied Eos Eye Shadow in the crease.
Then I added Lady Slipper Eye Shadow in the lower part of the crease line & outer corner as well to add a little depth.
Then I used Buttercream Eye Shadow as a highlighter, lightly dusting it across the brow bone, and around the tear duct.
To wrap it up, blend with a clean brush, and make any touch ups you might need (I touched up the Daffodil just a bit, to keep that bright pop of color). Then finish with your favorite mascara.


I didn't use our Shadow Boost Eye Shadow Primer
at all while creating the tutorial for this look. When doing step by
step photos, and having such large gaps of time between the application
of the primer before applying the eye shadow, well, it can make
application a pain. Using our Shadow Boost Eye Shadow Primer will help
prevent fading & creasing throughout the day (an essential for me
and my oily lids!!!), and will also boost your colors a little more.
I hope you enjoyed this!!!
Wednesday, May 23, 2012
Master The Look: Smoked Peaches
I don't know about you guys, but it's starting to get hotter and hotter around here (I love spring, and it's definitely starting to feel like summer already!), so I wanted to create a look this week featuring our HEAT WAVE Mineral Eye Shadow. Heat Wave is a gorgeous peach with a metallic shimmery finish. It looks wonderful with warm skin tones, and blends so well with so many colors (I actually did two looks with it this week, so you may be getting another post about this gorgeous color soon!)

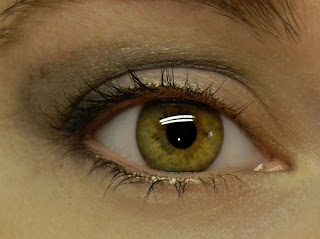
HEAT WAVE Mineral Eye Shadow is then applied across the main lid with our Smudger Brush, as well as along the lower lash line.

We then applied HADES Mineral Eye Shadow along the outer lower lash line & along the upper lash line, and lightly winged it out at the corner. (applied with our Angled Liner Brush)


We finished up the look by dusting CHAMPAGNE Mineral Eye Shadow across the brow bone, and at the inner corner and around the tear duct.
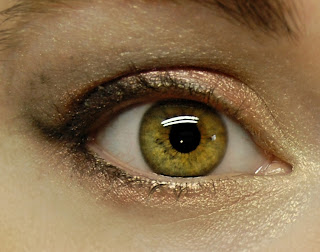
Touch up any areas as needed (we brightened up with a fresh spot of Heat Wave in the center of the lid, along with a little touching up of Heat Wave along the lower lash line (we winged it out underneath the line of Hades)), and blend with a clean brush, then apply your favorite mascara!


Step by Step Photo Tutorial
I didn't use our Shadow Boost Eye Shadow Primer at all while creating the tutorial for this look. When doing step by step photos, and having such large gaps of time between the application of the primer before applying the eye shadow, well, it can make application a pain. Using our Shadow Boost Eye Shadow Primer will help prevent fading & creasing throughout the day (an essential for me and my oily lids!!!), and will also boost your colors a little more.
To start it off, apply CHARCOAL Mineral Eye Shadow lightly along the crease line with our Fluffy Crease Brush. I wanted this to be a very light look, so I applied it very very lightly. If you want a darker bolder look, you can easily take this up a notch by darkening things up with the Charcoal & Hades shadows.
HEAT WAVE Mineral Eye Shadow is then applied across the main lid with our Smudger Brush, as well as along the lower lash line.
We then applied HADES Mineral Eye Shadow along the outer lower lash line & along the upper lash line, and lightly winged it out at the corner. (applied with our Angled Liner Brush)
We finished up the look by dusting CHAMPAGNE Mineral Eye Shadow across the brow bone, and at the inner corner and around the tear duct.
Touch up any areas as needed (we brightened up with a fresh spot of Heat Wave in the center of the lid, along with a little touching up of Heat Wave along the lower lash line (we winged it out underneath the line of Hades)), and blend with a clean brush, then apply your favorite mascara!

Wednesday, October 19, 2011
Gearing up for the Holidays
It's been a crazy couple of months around here, and well, we honestly don't expect them to slow down much until, oh, maybe March. LOL! But it's been a good crazy. Kids are obviously back in school. Our show up at Sundance Resort went really well. Silly us left the camera in the car, so we have no pictures at all. Which really is a shame, because a lot of the displays were brand new, and we finally had a banner created for us.
Holiday sales have definitely started rolling in, and Etsy is trying to do their best to make things difficult (soooo many changes in such a short time, and they always seem to do this right before the holidays). We really do hope to get back to our regular blogging, especially with new Get the Looks. If there are any shades or looks you'd like to see, let us know in the comments, and we'll see what we can do!
Holiday sales have definitely started rolling in, and Etsy is trying to do their best to make things difficult (soooo many changes in such a short time, and they always seem to do this right before the holidays). We really do hope to get back to our regular blogging, especially with new Get the Looks. If there are any shades or looks you'd like to see, let us know in the comments, and we'll see what we can do!
Subscribe to:
Posts (Atom)